Beyond The 100 Days
Thanks toIf played as intended, the player would normally be able to achieve scores of up to 60 days. The last mother dragon occurs at day 50, and then the game enters its final phase, quickly ramping up the double-headed dragons with the goal of forcing a loss within the next few days.
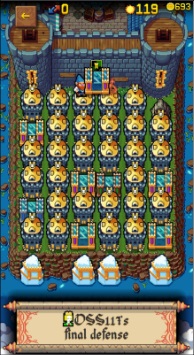
However, you may have noticed that many players have scores that go far beyond that. As of the moment of writing, the highest recorded score in Tower Swap is 119 days. So, how did they do it?
In order to get scores consistently higher than 60, one has to implement the Gold Chest Loop.
The secret lies in how the treasure chests are implemented. While regular chests reward the player with only 2 additional swaps, these rewards ramp up very quickly. The Bronze Chest provides 12 swaps, the Silver Chest 70 swaps, and the Gold Chest — 380 (!)
It turns out that the 380 swaps provided by the Gold Chest are more than enough to create another Gold Chest. Therefore, by reproducing the Gold Chest again and again, one can grow the amount of swaps indefinitely.
And that's how players can build boards filled with gold items which you can see when exploring player's top scores. You add a Gold Chest to the board, reproduce it again and again, while combining items from bronze to silver, from silver to gold, and slowly fill up your board with the most powerful items.
Getting over the 100 days
This straightforward implementation of the Gold Chest Loop will get you into days 60-100. However, in order to reliably reach the 100-th day and beyond, you would need to do much more and milk every single opportunity the game gives you to build the perfect board.
It's important to note that while the amount of dragons on each specific day is fixed, the way the dragons are distributed among the lanes is randomized. This may not seem like a big deal but at higher levels it introduces enough variation that even if you construct exactly the same board, the next time around the results might be very different.
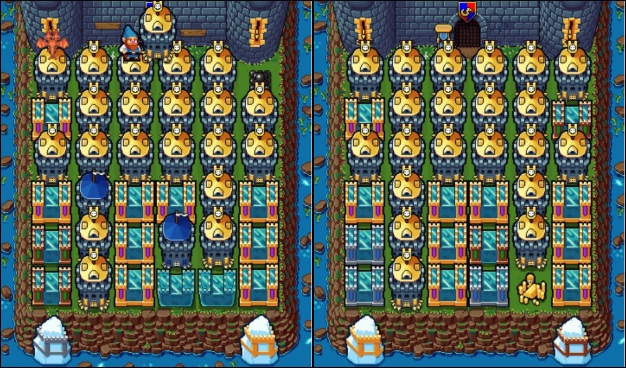
The formation on the left looks much worse than the one on the right. Yet, in both of these boards I have achieved the same score of 5111
Therefore, it's important to keep in mind that the very high scores you see out there are the result of both well-constructed boards and lots of luck. Creating exactly the same board does not guarantee the same result, and might end up being a disappointing run that barely gets you over the 100 days.
That said, this information will reliably get you over a 100 day barrier, so if this is what you want, this document is for you.
The Kauta Board
While today there is no hard evidence as to which formation works best, the community consensus seems to center around having 9 Gold Ice Walls and as many Gold Towers and Gold Icebergs as you can make.
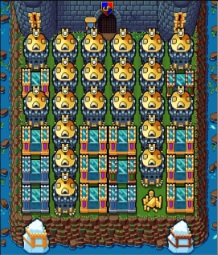
In this example, there are 9 Gold Ice Walls, 21 Gold Towers (+2 Gold Towers in the castle towers), 3 Silver Ice Walls and 2 Bronze Ice Walls
This board was first introduced by the player named Kauta in September of 2023. Thanks to
Kauta's thinking behind the formation is unknown but the formation works extremely well, and the community has figured out that the reason for having Ice Walls in those positions is to attempt to redistribute the waves of dragons into three separate streams—the fast stream, the medium stream and the slow stream—thus reducing the load on the final rows and the castle towers.
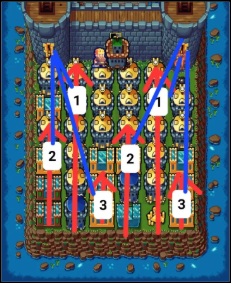
This diagram was made by UnfazedCC
There have been further developments, specifically the 119 board which we have already mentioned. With the introduction of Icebergs, it made sense to replace the 4 Gold Ice Walls with 4 Gold Icebergs and allow for 4 more Gold Towers.
Building such a formation is extremely hard, and while the gains are there, the returns are quickly diminishing. Yours truly wasn't able to get this formation even though I started to farm for bonuses with a supply of 16k swaps. Based on the observed probabilities, one might require at least double that to guarantee all the necessary bonuses, if not more. People have built up to 100k swaps in order to ensure that they beat the odds.
So, let's turn to a more realistic build, one which can still get you scores as high as 116, and definitely over a 100.
The Build
A very important technical warning: once you start your build, do not switch to another device. If you start on, say, the browser version of the game, and then attempt to switch to your mobile app, your game will likely be lost—you will see a note in the mobile app saying that the game is already in progress on another platform, but when you'll attempt to load it in a browser, you'll get the same error message. If something like this does happen to you, you may try to contact the developer through their Discord but better stay safe and pick a single platform to play on.
The build consists of several main phases:
- producing a Gold Chest from scratch
- building up the swaps and items (Gold Ice Walls and Gold Towers)
- finalizing the build by farming the chests for anvils and bonus items for when you no longer have space to construct silver and gold items
- using a gold item from your inventory, which is why the Gold Chest needs to be made from scratch
Now let's look at the build in detail.
- Click the Pause button and make sure to check "Wait at end of each day" and "Double tap chest open". You don't want the day to automatically end when you're out of swaps, nor do you want to accidentally open a chest.
-
Build a Silver Chest
- You will have to balance surviving the attacks and accumulating chests. Sometimes this will be challenging, as bonus swaps from the chests are a big part of the intended gameplay. Be prepared to restart if you get unlucky and there isn't enough gold.
- Your goal is to build a Silver Chest within the first 15 days or so. You most likely won't be able to survive further as by day 15 the amount of dragons becomes quite intimidating.
-
Build a Gold Chest aka "The Silver Chest Loop"
- Presumably the most frustrating part of the build is getting from a single Silver Chest to a Gold Chest. The method itself is quite clever and was invented by UnfazedCC.
- The Silver Chest provides 70 swaps, an amount that is usually just enough to reconstruct another Silver Chest by the time you're out of swaps. But it will only work if you play as efficiently as possible. The trick is to focus on gold and chests only. Play mostly on the last row and begin discarding everything that's not gold or chests straight into the water. Your goal is to use this mechanic to remove the unnecessary items from the board as efficiently as possible in the service of making chests. Do this strategically. Create opportunities to match resources and items. Match 4 and more to get additional swaps. Matching 4 or more items will usually give you more swaps than matching 4 or more resources, so keep that in mind also. Sometimes matching a lot of resources/items won't give you many additional swaps or might even lose you some. This could still be worth it, as receiving at least some swaps in return reduces the speed with which you are losing them, and at the same time clears the board. For a video on how this looks, try this tutorial by UnfazedCC.
- In the vast majority of cases you will be able to recreate the Silver Chest in slightly less than 70 swaps. Your goal, however, is to grow the amount of chests by the end of each cycle. Unfortunately, since you are reliant on the random number generator in the game, you might have long series of bad streaks that make it difficult.
- This might lead to many cycles when by the time you reach the end of your swaps, you're essentially back to where you started from. That's why it's called the "Silver Chest Loop". Sometimes you build up to, say, a spare Silver Chest and a couple of Bronze chests, only to lose some of it due to a bad streak so that by the time you're out of swaps you're down to just one spare Silver Chest.
- Apart from efficient play, there is a 33% chance of getting a bonus from a Silver Chest. So, each time you reach 0 swaps and have to activate the re-created Silver Chest, you're fairly likely to get a useful bonus.
- The important thing is to not give up. Out of all the cases when I tried creating the Gold Chest from scratch, once I made the Silver one, I was able to produce the Gold Chest every time without fail. It's just that in some cases it took me only 5 cycles, in some 30 and in some cases even more. My worst attempt took about two hours of play.
-
Build up a sufficient amount of swaps
- Once you have the Gold Chest, the difficult part is over. The rest is mostly down to sheer time.
- It takes around 150-250 swaps to recreate another Gold Chest, depending on your efficiency, luck and the amount of available lanes. Therefore, each cycle will allow you to add 130-230 swaps to your stack.
- You can combine creating swaps with making your first Gold Ice Walls and Gold Towers, although don't make too many as you want to have enough lanes to make Gold Chests efficiently. The less lanes you have, the more swaps is required to create an item. Additionally, you will need to store all the intermediate chests in the process, thus reducing the amount of available lanes and/or wasting swaps on organizing your space.
- The minimum amount of swaps for the required formation seems to be around 2-2.5k. If this is your first run, 4-5k is advised.
-
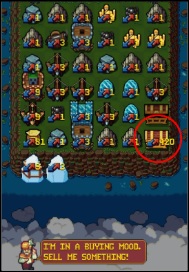
A nice trick to build up swaps faster is to at some point create a spare Gold Chest and wait for the "I'm in a buying mood" bonus. The Merchant will be ready to buy the Gold Chest for 420 swaps, which is +40 swaps on top of the usual 380.
-
Create all the necessary items for the build
- First of all, create the two Gold Towers to arm the castle. This is important, as it's an easy step to forget. People have spent days building their formation, only to then realize they forgot to arm the castle.
- Create the 9 Gold Ice Walls
- Create the 19 Gold Towers
-
Farm chests for the 20th Gold Tower (29th gold item)
- There are 36 slots on the board, giving you enough space to create 28 gold items.
-
Create the two Silver Towers, two Bronze ones and one regular to arrive at this position:
- Now your goal is to farm chests and wait for bonuses. There is a 4% chance that a regular chest will produce a bonus, which means that on average you will get a bonus for every 25 chests created.
- The bonus you are waiting for is either a Bronze Anvil, a Silver Anvil or a Bronze Tower. Once you get it, you will be able to create the 29th item, and the 20th Gold Tower.
-
Continue farming chests for additional items.
- There is no consensus on what items these need to be, only that they have to be Ice Walls and/or Towers, and the stronger, the better. Below this list are the three examples of formations that broke the 110 day barrier. You can find more by going through the clans and looking through the players' Best Defenses.
- Make sure to fill all the spots. You should end up with two empty slots, and one of those slots will later be filled with the Gold Tower from the inventory, leaving you with only one empty spot. This is surprisingly easy to mess up by adding the Gold Tower before you do that, and thus robbing you of one additional item.
- Always take Icebergs. Remember, they are also of different kinds and can be combined into the Silver and Gold variety. Your goal would be to make the slow lanes even slower. Don't put icebergs in front of lanes which are supposed to be fast, otherwise you might cancel out the advantage of the formation.
- Don't forget to build up the maximum amount of castle hearts by fixing the castle with stones. Sometimes a bonus will require you to sacrifice hearts. Make sure that by the time you're about to begin the game, the hearts are maxed out.
- It's helpful if the empty slot ends up being on top so that in case of an emergency you can farm stones throughout the game to fix the castle if it was hit.
-
Once you're almost out of swaps and ready to begin the game, add the final Gold Tower from your Inventory.
- It's important to do this only at the end of the process, so that you have enough space to continue farming for additional items effectively.
- While you will probably have enough swaps to both farm the items and set the items in all the right positions, you don't have to do it all beforehand. Your formation will be so strong regardless of the position, that you can use the limited moves you will have to finalize the details without worrying of getting hit. You won't have a serious challenge until, perhaps, day 70.
- Do be wary of the last couple of mother dragons, though, as they move quickly and may succeed in hitting the castle. If the lane she chooses has no Ice Walls, move at least one in her way.
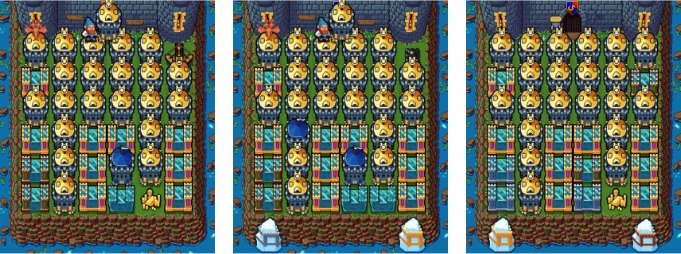
Variations of the consensus formations. The three examples listed reached 116, 111 and 111 days respectively. Take note of items 31-35.
The main cost of this is time. It takes at least 8-10 hours of continuous play to get through the whole process. This might translate into days if you have only limited time to play.
Beyond the 30 items
The Kauta board uses 30 gold items, with one created through bonus farming and one taken from the inventory. The famous 119 formation uses 33 gold items. This requires creating 32 gold items without the inventory.
Items 30 and 31 are fairly trivial to produce and are made through creating bronze items and then farming for silver anvils.
The build of the 32nd item is trickier. At this point you will have only 5 free slots left.
- 3 silver anvils are collected to produce a gold anvil
- with 4 slots left, a bronze item is obtained either directly through a bonus or through combining a regular item with a bronze anvil
- another silver anvil is farmed
- the gold item is made by combining the bronze item with a silver anvil, and then the silver item with the gold anvil
It's important to understand that the time cost of this formation is immense. The last three items will require a mind-numbing amount of bonus farming and a supply of 50k swaps at the very least. OSS117 (Discord username tohubohu) used 115k swaps for their run.
Even then, you are not guaranteed to reach 119. OSS117, for example, got incredibly lucky in their run. As you can see in the video, they survived day 117 with only one heart left! The end game is cruel. As they say, enter at your own peril!
Credits
I would like to thank the Tower Swap Discord community for providing many of the insights and data, and specifically folks like UnfazedCC, Cromat, Moloch, Tohubohu and Wolverine. Thanks to